Docker Environment Variables: Development vs Production Made Simple
When building applications with Docker, managing environment variables across different environments can be tricky. Here’s a clean, practical approach we’ll demonstrate with a real FastAPI application that keeps development smooth while ensuring production deployments are secure.
The Problem We’re Solving
Most developers start with a simple setup that works locally but creates problems in production:
# This works locally but causes issues in production
version: '3.8' services: my-app: build: . env_file: .env # This will override production env vars! \ Problems:
.envfile overrides production environment variables- Sensitive data accidentally gets deployed
- Production servers can’t inject their own configuration
Our Solution: Clean Separation with Docker Compose
We’ll build a FastAPI application that demonstrates the right way to handle this.
The Application Structure
fastapi-docker-env-demo/ ├── main.py # FastAPI application ├── requirements.txt # Dependencies ├── Dockerfile # Production-ready container ├── docker-compose.yml # Base config (production-ready) ├── docker-compose.override.yml # Development overrides ├── .env # Local development variables └── .env.production.example # Production reference Step 1: FastAPI Application with Environment Config
main.py:
import os from fastapi import FastAPI import uvicorn from dotenv import load_dotenv # Load environment variables from .env file if it exists load_dotenv() app = FastAPI( title="Docker Environment Demo", description="Demonstrating Docker environment variable best practices", version="1.0.0" ) # Environment configuration with sensible defaults class Config: # Application settings APP_NAME = os.getenv("APP_NAME", "Docker Environment Demo") ENVIRONMENT = os.getenv("ENVIRONMENT", "development") DEBUG = os.getenv("DEBUG", "false").lower() == "true" HOST = os.getenv("HOST", "0.0.0.0") PORT = int(os.getenv("PORT", "8000")) # Database settings DATABASE_URL = os.getenv("DATABASE_URL", "sqlite:///./dev.db") # API settings API_KEY = os.getenv("API_KEY", "dev-api-key-12345") SECRET_KEY = os.getenv("SECRET_KEY", "dev-secret-key") # Third-party services REDIS_URL = os.getenv("REDIS_URL", "redis://localhost:6379") EMAIL_SERVICE_URL = os.getenv("EMAIL_SERVICE_URL", "https://api.dev-email-service.com") # Feature flags ENABLE_CACHING = os.getenv("ENABLE_CACHING", "true").lower() == "true" ENABLE_ANALYTICS = os.getenv("ENABLE_ANALYTICS", "false").lower() == "true" config = Config() @app.get("/") async def root(): """Welcome endpoint with basic app info""" return { "message": f"Welcome to {config.APP_NAME}!", "environment": config.ENVIRONMENT, "debug": config.DEBUG, "version": "1.0.0" } @app.get("/env") async def get_environment_variables(): """Shows all environment variables currently loaded by the app""" return { "APP_NAME": config.APP_NAME, "ENVIRONMENT": config.ENVIRONMENT, "DEBUG": config.DEBUG, "HOST": config.HOST, "PORT": config.PORT, "DATABASE_URL": config.DATABASE_URL, "API_KEY": config.API_KEY, "SECRET_KEY": config.SECRET_KEY, "REDIS_URL": config.REDIS_URL, "EMAIL_SERVICE_URL": config.EMAIL_SERVICE_URL, "ENABLE_CACHING": config.ENABLE_CACHING, "ENABLE_ANALYTICS": config.ENABLE_ANALYTICS } if __name__ == "__main__": uvicorn.run( "main:app", host=config.HOST, port=config.PORT, reload=config.DEBUG, log_level="debug" if config.DEBUG else "info" ) Step 2: Production-Ready Docker Configuration
Dockerfile:
FROM python:3.11-slim WORKDIR /app # Install dependencies COPY requirements.txt . RUN pip install --no-cache-dir -r requirements.txt # Copy application COPY . . # Security: non-root user RUN adduser --disabled-password appuser && chown -R appuser /app USER appuser EXPOSE 8000 CMD ["python", "main.py"] docker-compose.yml (Production-ready base):
version: '3.8' services: fastapi-app: build: . image: fastapi-env-demo:latest container_name: fastapi-env-demo ports: - "8000:8000" environment: - PYTHONPATH=/app restart: unless-stopped Step 3: Development Override Configuration
docker-compose.override.yml (Development additions):
version: '3.8' services: fastapi-app: env_file: - .env environment: # Override for development - ENVIRONMENT=development - DEBUG=true volumes: # Enable hot reload in development - .:/app command: ["uvicorn", "main:app", "--host", "0.0.0.0", "--port", "8000", "--reload"] \
Step 4: Environment Variable Files
.env (Local development):
# Development environment variables APP_NAME=Docker Environment Demo ENVIRONMENT=development DEBUG=true HOST=0.0.0.0 PORT=8000 # Database settings DATABASE_URL=sqlite:///./dev.db # API settings API_KEY=dev-api-key-12345 SECRET_KEY=dev-secret-key-for-local-development # Third-party services REDIS_URL=redis://localhost:6379 EMAIL_SERVICE_URL=https://api.dev-email-service.com # Feature flags ENABLE_CACHING=true ENABLE_ANALYTICS=false .env.production.example (Production reference):
# Set these on your production server APP_NAME=My Production API ENVIRONMENT=production DEBUG=false DATABASE_URL=postgresql://user:pass@db:5432/prod API_KEY=your-production-api-key SECRET_KEY=your-super-secure-production-secret REDIS_URL=redis://redis:6379 EMAIL_SERVICE_URL=https://api.your-email-service.com ENABLE_CACHING=true ENABLE_ANALYTICS=true How It Works
Local Development Workflow
# Simply run this - Docker Compose automatically merges the files docker-compose up --build What happens:
- Loads base
docker-compose.yml - Automatically merges
docker-compose.override.yml - Loads your
.envfile viaenv_filedirective - Enables hot reload and debug mode
- Mounts source code for live editing
Production Deployment
# Deploy using only the base configuration docker-compose -f docker-compose.yml up -d --build then using .env.production.example file in the production environment.For example we are deploying to Digitalocean app platform that is using docker registry. you should connect to the docker registry, tag you images like the following then push.
docker tag <image-name>:<tag> <registry-url>/<reg-name>/<image-name>:<tag> docker push <registry-url>/<reg-name>/<image-name>:<tag>
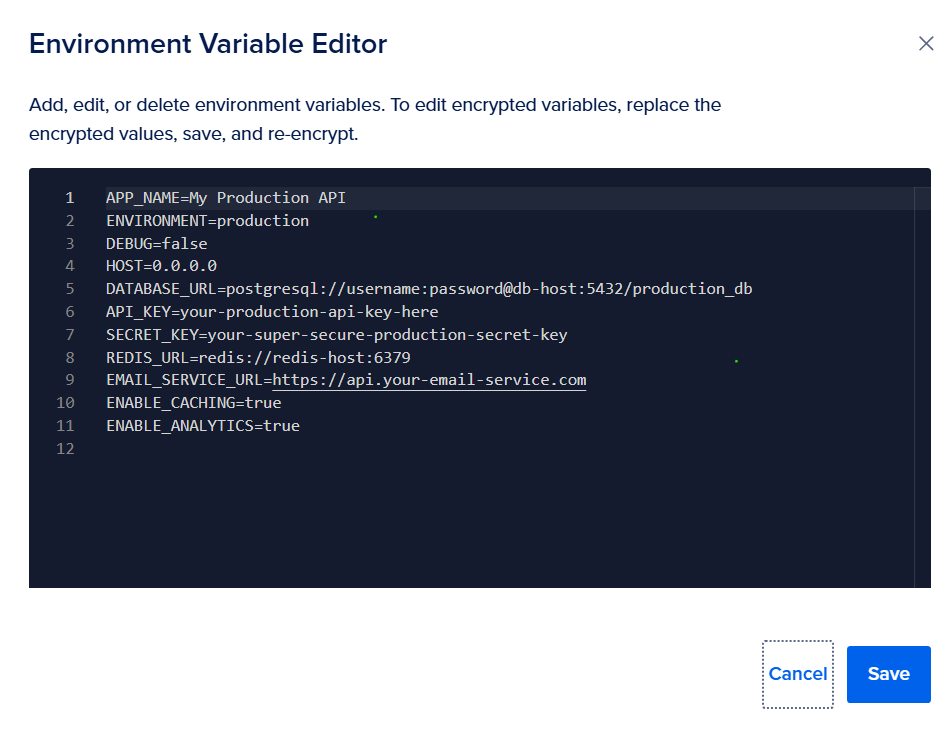
in Digitalocean app platform, you can bluk load the env variables by going to settings, then in the “App-LevelEnvironment Variables” section choose “Bulk Editor” like here:
and here you go, let test now
Testing Your Setup
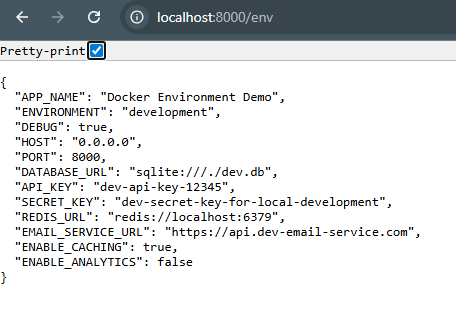
The /env endpoint makes it super easy to verify your configuration:
Development Test
curl http://localhost:8000/env Response:
Production Test
curl http://your-server:8000/env For example you deploy to Digitalocean app platform that is
Response:

Quick Start
- Clone the project
- Start development:
docker-compose up --build - Visit: http://localhost:8000/env to see your configuration
Conclusion
This approach gives you the best of both worlds:
- Easy local development with automatic
.envloading - Clean production deployments that respect server environment variables
- Same Docker image works in all environments
- Simple testing with the
/envendpoint
The key insight: Keep your base docker-compose.yml production-ready, and use override files for development conveniences.
This pattern scales from simple applications to complex microservices and works with any deployment platform. Your development team gets a smooth workflow, and your production deployments stay secure and maintainable.
The complete working example is available as a FastAPI application that demonstrates all these concepts in action.


추천 콘텐츠

The Surprising Top 5 Digital Assets Dominating Social Media And AI Searches In 2025

Over 50% Now In Loss Territory As Glassnode Reveals Alarming Market Data