How to Set Up Your Own Google Analytics Alternative Using Umami

Website analytics are crucial for understanding how visitors interact with your content.
\ While Google Analytics dominates the market, it often raises privacy concerns and can be complex for small projects.
\ If you’re looking for a simpler, open-source, and privacy-friendly solution, Umami is the ideal alternative. It’s lightweight, easy to deploy, and doesn’t track personal data, making it compliant with modern privacy laws like GDPR.
\ In this article, you’ll learn what Umami is, why it’s an excellent Google Analytics alternative, and how to set it up on your own server from scratch using Sevalla.
Understanding Umami
Umami is an open-source web analytics platform designed to be fast, simple, and privacy-focused.
\ It collects essential website data like page views, referrals, and device information without storing personally identifiable details. Unlike Google Analytics, Umami doesn’t use cookies or share data with third parties.
\ The project is actively maintained by the open-source community and has grown into one of the most trusted tools for developers and businesses who want full control over their analytics. It provides a clean dashboard that shows all the key metrics in real time and works across any website or application
You can find the project on GitHub at github.com/umami-software/umami and even try a live demo here.
Why Choose Umami Over Google Analytics
Google Analytics is powerful but often overwhelming for simple websites. It’s also tied to Google’s data collection ecosystem, which can conflict with privacy-focused organizations.
\ Umami takes a different approach. It collects only the information you need to make decisions, such as traffic sources and popular pages, and it stores everything on your own infrastructure.
\ There are no third-party cookies, no user tracking, and no hidden integrations. You get complete ownership of your data and peace of mind knowing that it’s not leaving your server.
\ Plus, Umami is free under the MIT license, making it suitable for both personal projects and commercial deployments.
How to Install Umami
Before you begin, make sure you have a few basic tools and requirements ready.
\ You’ll need a server with Node.js version 18.18 or newer installed. Umami also requires a database to store analytics data. It supports PostgreSQL (version 12.14 or higher), MySQL (version 8.0 or higher), and MariaDB (version 10.5 or higher).
Step 1: Get the Source Code
The first step is to download the Umami source code from GitHub. Open your terminal and run:
git clone https://github.com/umami-software/umami.git
cd umami
pnpm install
The pnpm install command installs all the necessary dependencies for the application. Make sure you have pnpm installed globally before running this command. You can install it by running npm install -g pnpm.
Step 2: Configure the Database
Next, you need to configure a database connection. Create a new .env file in the root directory of the Umami project. Inside this file, add the following line:
DATABASE_URL=connection-url
\ Replace connection-url with your actual database connection string. Here are two examples depending on your database type:
For PostgreSQL:
postgresql://username:password@localhost:5432/umami
\ For MySQL:
mysql://username:password@localhost:3306/umami
\ This connection string allows Umami to connect to your database and automatically create the necessary tables during the setup.
Step 3: Build the Application
Once your configuration is complete, you can build the application by running:
pnpm run build
\ This step compiles the code and prepares it for production. It will also initialize your database with the required tables and create a default admin account.
\ You can log in with the username admin and password umami after setup. It’s a good idea to change this password immediately once you log in for the first time.
Step 4: Start the Server
Now, it’s time to start the application. Run the following command:
pnpm run start
\ By default, Umami will start on http://localhost:3000. You can open this address in your browser to access the analytics dashboard. If you want to make it accessible publicly, you’ll need to configure a reverse proxy using a web server like Nginx.
Step 5: Keeping Umami Updated
Like any software, Umami receives regular updates that include new features, security patches, and performance improvements. Keeping your installation up to date is simple.
\ If you installed from source, navigate to your Umami folder and run:
git pull
pnpm install
pnpm run build
\ This command updates the source code, installs new dependencies, and rebuilds the app. If you are using Docker, you can update by pulling the latest images and restarting the containers:
docker compose pull
docker compose up — force-recreate -d
\ Regularly updating ensures you have access to the latest analytics features and bug fixes.
Step 6: Adding Tracking to Your Website
After you log in to the dashboard, you’ll see an option to add a new website. Once you create it, Umami will generate a small tracking script.
\ Copy the script tag and paste it into the section of your website’s HTML pages.
\ This script is lightweight and won’t slow down your website. Once added, you’ll start seeing traffic data in your dashboard almost instantly
You can track multiple websites from the same Umami installation, making it ideal for developers managing several projects.
Step 7: Exploring the Dashboard
The Umami dashboard is clean, modern, and easy to understand. It shows metrics such as page views, referrers, operating systems, and devices. You can filter by date, view live visitors, and export data for reporting.
\ There are no complicated configuration options or hidden features — just the information you need to make informed decisions about your website traffic. Everything runs fast, even on modest servers.
Hosting Umami on the Cloud Using Sevalla
When you are ready to move beyond testing, Umami gives you two options. You can self-host it using your own infrastructure or use their managed cloud version at Umami.is.
\ Self-hosting gives you full control and is usually preferred by technical teams who want to keep sensitive data in-house.
\ You can choose any cloud provider, like AWS, DigitalOcean, or others, to set up Umami. But I will be using Sevalla.
\ Sevalla is a PaaS provider designed for developers and dev teams shipping features and updates constantly in the most efficient way. It offers application hosting, database, object storage, and static site hosting for your projects.
\ I am using Sevalla for two reasons:
- Every platform will charge you for creating a cloud resource. Sevalla comes with a $50 credit for us to use, so we won’t incur any costs for this example.
- Sevalla has a template for Umami, so it simplifies the manual installation and setup for each resource you will need for installation.
\ Log in to Sevalla and click on Templates. You can see Umami as one of the templates.
Click on the “Umami” template. You will see the resources needed to provision the application, like PostgreSQL and Redis. Click on “Deploy Template”
You can see the resource being provisioned. Once the resources are provisioned, go to your Umami application and click on “Visit app.”
\ You will get a cloud URL with a login page. Use the default login credentials admin for username and umami for password. You will see the empty dashboard.
\

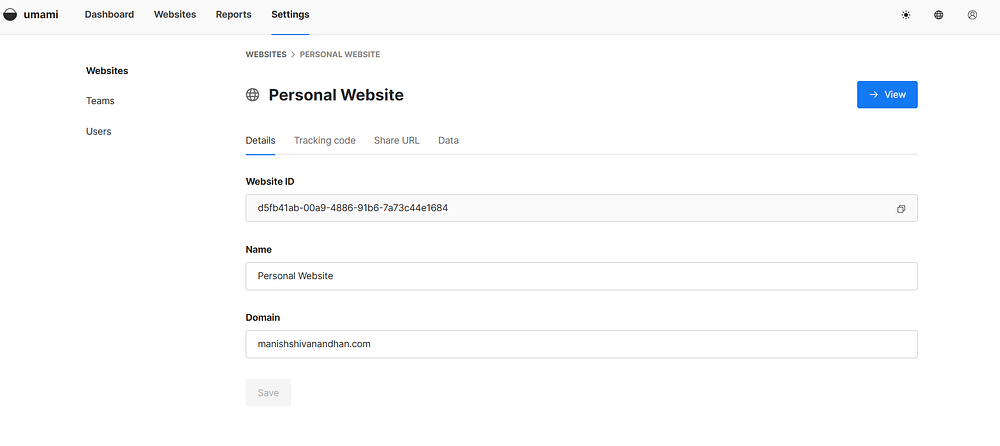
You now have a production-grade Umami server running on the cloud. You can use this to set up analytics for your website by clicking on “Settings” and then “Add website”.
You can then click “Edit” to get the tracking code for your website.
\
Once you add the tracking code for your website, you can start monitoring your traffic and other analytics in your new dashboard.
Privacy and Compliance
One of the best reasons to use Umami is its commitment to privacy. It doesn’t use cookies, doesn’t track individual users, and doesn’t share data with any third-party service.
All information stays on your server. This makes it a great choice for websites that need to comply with privacy laws like GDPR, CCPA, or PECR.
\ Since you own the data, you can decide how long to keep it, how to analyze it, and who has access.
Conclusion
Setting up your own analytics system might sound complex, but with Umami, it’s surprisingly easy. It gives you everything you need to understand your website traffic without compromising user privacy. You control the data, the infrastructure, and the configuration.
\ By following these steps, you can deploy Umami on your own server in less than an hour and start monitoring your website visitors right away. Whether you run a personal blog, a SaaS platform, or a client project, Umami offers a transparent, fast, and privacy-friendly alternative to Google Analytics.
\ Hope you enjoyed this article. Find me on Linkedin or visit my website
\


추천 콘텐츠
Coinbase Urges Treasury to Clarify GENIUS Act Implementation

Q2 Market Insights: Bitcoin regains dominance in risk-averse environment, ETFs remain critical to market structure