

Securing Your MCP Server: a Step-by-Step Guide
The Model Context Protocol (MCP) provides a powerful, standardized way for LLMs to interact with external tools. But as soon as you move from a local demo to a real-world application, a critical question arises: How do you secure it?
\ Exposing an MCP server without security is like leaving the front door of your house wide open. Anyone could walk in and use your tools, access your data, or cause havoc.
\ This guide will walk you through securing a Node.js MCP server from the ground up using JSON Web Tokens (JWT). We'll cover authentication (who are you?) and authorization (what are you allowed to do?), with practical code samples based on this project that can be found at Azure-Samples/mcp-container-ts.
\
The Goal: From Unprotected to Fully Secured
Our goal is to take a basic MCP server and add a robust security layer that:
-
Authenticates every request to ensure it comes from a known user.
-
Authorizes the user, granting them specific permissions based on their role (e.g.,
adminvs.readonly). -
Protects individual tools, so only authorized users can access them.
\
Why JWT is Perfect for MCP Security
JWT is the industry standard for securing APIs, and it's an ideal fit for MCP servers for a few key reasons:
-
Stateless: Each JWT contains all the information needed to verify a user. The server doesn't need to store session information, which makes it highly scalable—perfect for handling many concurrent requests from AI agents.
-
Self-Contained: A JWT can carry user details, their role, and specific permissions directly within its payload.
-
Tamper-Proof: JWTs are digitally signed. If a token is modified in any way, the signature becomes invalid, and the server will reject it.
-
Portable: A single JWT can be used to access multiple secured services, which is common in microservice architectures.
\
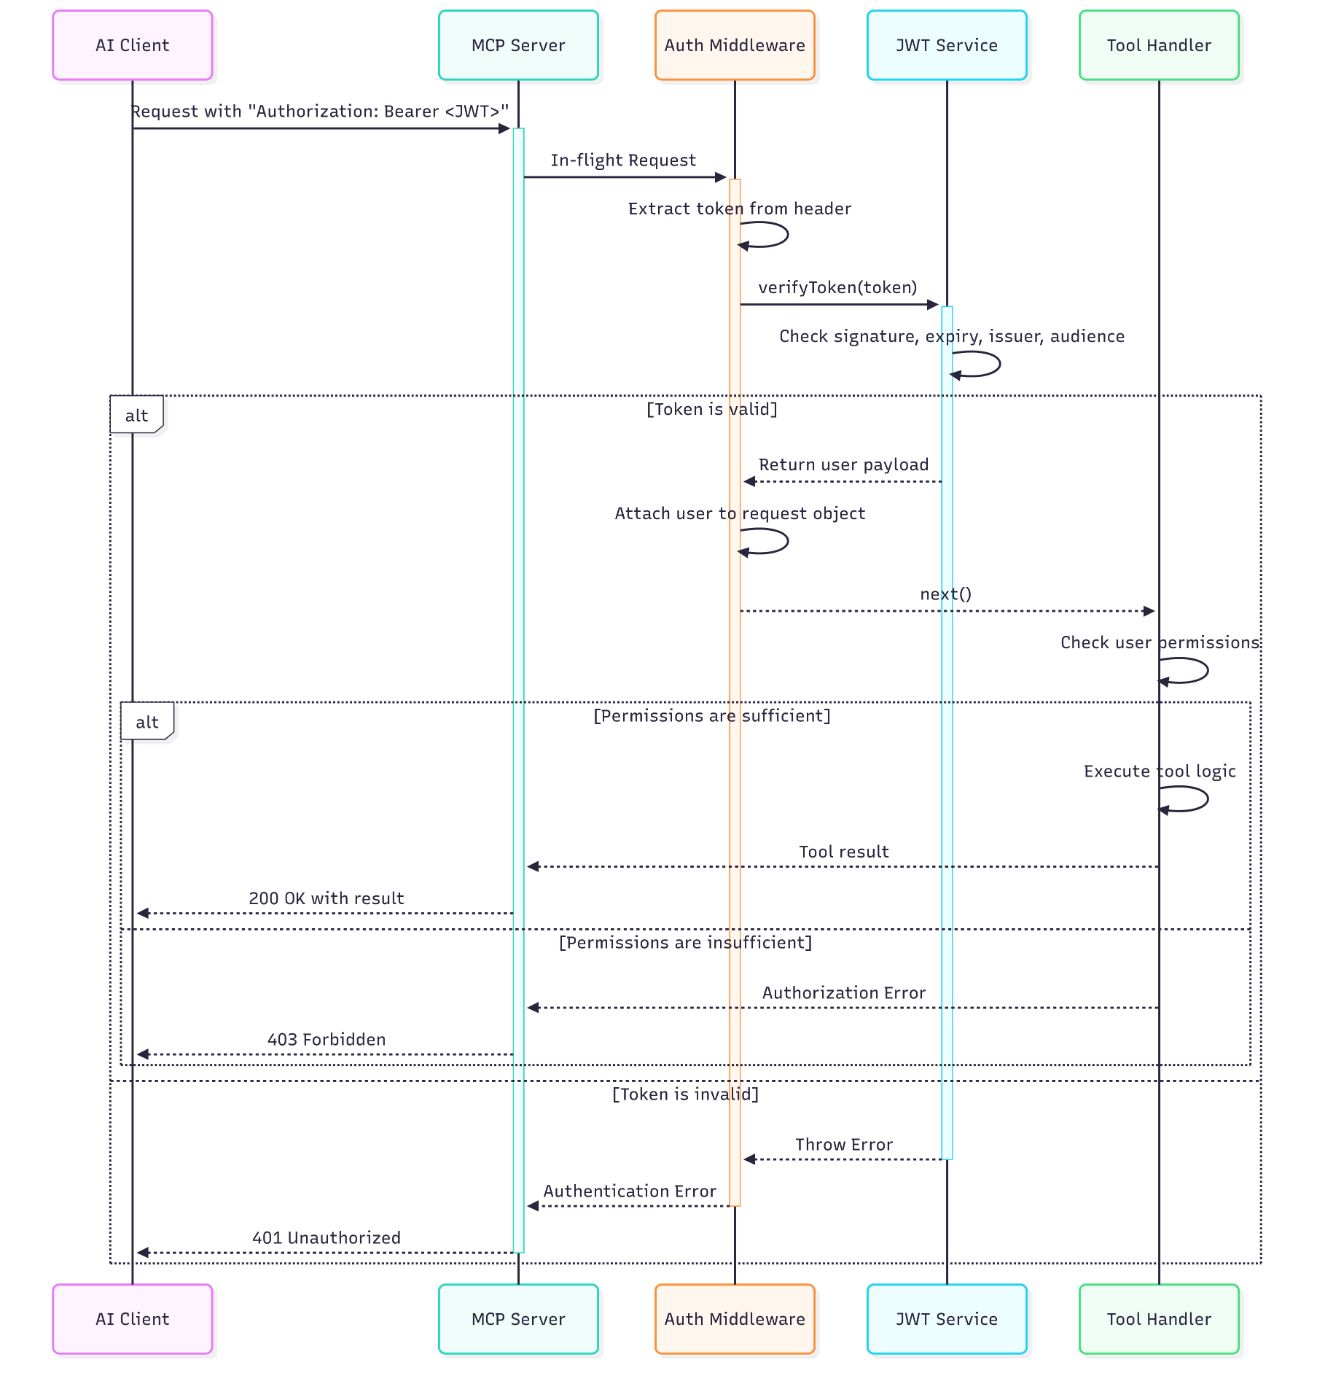
Visualizing the Security Flow
For visual learners, this sequence diagram illustrates the complete authentication and authorization flow:
\
A Note on MCP Specification Compliance!
It's important to note that this guide provides a practical, real-world implementation for securing an MCP server, but it does not fully implement the official MCP authorization specification.
\ This implementation focuses on a robust, stateless, and widely understood pattern using traditional JWTs and role-based access control (RBAC), which is sufficient for many use cases. However, for full compliance with the MCP specification, you would need to implement additional features. In a future post, we may explore how to extend our JWT implementation to fully align with the MCP specification.
\ We recommend staring the GitHub repository to stay updated and receive notifications about future improvements.
\
Step 1: Defining Roles and Permissions
Before writing any code, we must define our security rules. What roles exist? What can each role do? This is the foundation of our authorization system.
\ In our src/auth/authorization.ts file, we define UserRole and Permission enums. This makes our code clear, readable, and less prone to typos.
// src/auth/authorization.ts export enum UserRole { ADMIN = "admin", USER = "user", READONLY = "readonly", } export enum Permission { CREATE_TODOS = "create:todos", READ_TODOS = "read:todos", UPDATE_TODOS = "update:todos", DELETE_TODOS = "delete:todos", LIST_TOOLS = "list:tools", } // This interface defines the structure of our authenticated user export interface AuthenticatedUser { id: string; role: UserRole; permissions: Permission[]; } // A simple map to assign default permissions to each role const rolePermissions: Record<UserRole, Permission[]> = { [UserRole.ADMIN]: Object.values(Permission), // Admin gets all permissions [UserRole.USER]: [ Permission.CREATE_TODOS, Permission.READ_TODOS, Permission.UPDATE_TODOS, Permission.LIST_TOOLS, ], [UserRole.READONLY]: [Permission.READ_TODOS, Permission.LIST_TOOLS], }; \
Step 2: Creating a JWT Service
Next, we need a centralized service to handle all JWT-related logic: creating new tokens for testing and, most importantly, verifying incoming tokens. This keeps our security logic clean and in one place.
\ Here is the complete src/auth/jwt.ts file. It uses the jsonwebtoken library to do the heavy lifting.
// src/auth/jwt.ts import * as jwt from "jsonwebtoken"; import { AuthenticatedUser, getPermissionsForRole, UserRole, } from "./authorization.js"; // These values should come from environment variables for security const JWT_SECRET = process.env.JWT_SECRET!; const JWT_AUDIENCE = process.env.JWT_AUDIENCE!; const JWT_ISSUER = process.env.JWT_ISSUER!; const JWT_EXPIRY = process.env.JWT_EXPIRY || "2h"; if (!JWT_SECRET || !JWT_AUDIENCE || !JWT_ISSUER) { throw new Error("JWT environment variables are not set!"); } /** * Generates a new JWT for a given user payload. * Useful for testing or generating tokens on demand. */ export function generateToken( user: Partial<AuthenticatedUser> & { id: string } ): string { const payload = { id: user.id, role: user.role || UserRole.USER, permissions: user.permissions || getPermissionsForRole(user.role || UserRole.USER), }; return jwt.sign(payload, JWT_SECRET, { algorithm: "HS256", expiresIn: JWT_EXPIRY, audience: JWT_AUDIENCE, issuer: JWT_ISSUER, }); } /** * Verifies an incoming JWT and returns the authenticated user payload if valid. */ export function verifyToken(token: string): AuthenticatedUser { try { const decoded = jwt.verify(token, JWT_SECRET, { algorithms: ["HS256"], audience: JWT_AUDIENCE, issuer: JWT_ISSUER, }) as jwt.JwtPayload; // Ensure the decoded token has the fields we expect if (typeof decoded.id !== "string" || typeof decoded.role !== "string") { throw new Error("Token payload is missing required fields."); } return { id: decoded.id, role: decoded.role as UserRole, permissions: decoded.permissions || [], }; } catch (error) { // Log the specific error for debugging, but return a generic message console.error("JWT verification failed:", error.message); if (error instanceof jwt.TokenExpiredError) { throw new Error("Token has expired."); } if (error instanceof jwt.JsonWebTokenError) { throw new Error("Invalid token."); } throw new Error("Could not verify token."); } } \
Step 3: Building the Authentication Middleware
A "middleware" is a function that runs before your main request handler. It's the perfect place to put our security check. This middleware will inspect every incoming request, look for a JWT in the Authorization header, and verify it.
\ If the token is valid, it attaches the user's information to the request object for later use. If not, it immediately sends a 401 Unauthorized error and stops the request from proceeding further.
\ To make this type-safe, we'll also extend Express's Request interface to include our user object.
// src/server-middlewares.ts import { Request, Response, NextFunction } from "express"; import { verifyToken, AuthenticatedUser } from "./auth/jwt.js"; // Extend the global Express Request interface to add our custom 'user' property declare global { namespace Express { interface Request { user?: AuthenticatedUser; } } } export function authenticateJWT( req: Request, res: Response, next: NextFunction ): void { const authHeader = req.headers.authorization; if (!authHeader || !authHeader.startsWith("Bearer ")) { res.status(401).json({ error: "Authentication required", message: "Authorization header with 'Bearer' scheme must be provided.", }); return; } const token = authHeader.substring(7); // Remove "Bearer " try { const userPayload = verifyToken(token); req.user = userPayload; // Attach user payload to the request next(); // Proceed to the next middleware or request handler } catch (error) { res.status(401).json({ error: "Invalid token", message: error.message, }); } } \
Step 4: Protecting the MCP Server
Now we have all the pieces. Let's put them together to protect our server.
\ First, we apply our authenticateJWT middleware to the main MCP endpoint in src/index.ts. This ensures every request to /mcp must have a valid JWT.
// src/index.ts // ... other imports import { authenticateJWT } from "./server-middlewares.js"; // ... const MCP_ENDPOINT = "/mcp"; const app = express(); // Apply security middleware ONLY to the MCP endpoint app.use(MCP_ENDPOINT, authenticateJWT); // ... rest of the file \ Next, we'll enforce our fine-grained permissions. Let's secure the ListTools handler in src/server.ts. We'll modify it to check if the authenticated user has the Permission.LIST_TOOLS permission before returning the list of tools.
// src/server.ts // ... other imports import { hasPermission, Permission } from "./auth/authorization.js"; // ... inside the StreamableHTTPServer class private setupServerRequestHandlers() { this.server.setRequestHandler(ListToolsRequestSchema, async (request) => { // The user is attached to the request by our middleware const user = this.currentUser; // 1. Check for an authenticated user if (!user) { return this.createRPCErrorResponse("Authentication required."); } // 2. Check if the user has the specific permission to list tools if (!hasPermission(user, Permission.LIST_TOOLS)) { return this.createRPCErrorResponse( "Insufficient permissions to list tools." ); } // 3. If checks pass, filter tools based on user's permissions const allowedTools = TodoTools.filter((tool) => { const requiredPermissions = this.getToolRequiredPermissions(tool.name); // The user must have at least one of the permissions required for the tool return requiredPermissions.some((p) => hasPermission(user, p)); }); return { jsonrpc: "2.0", tools: allowedTools, }; }); // ... other request handlers } \ With this change, a user with a readonly role can list tools, but a user without the LIST_TOOLS permission would be denied access.
\
Conclusion and Next Steps
Congratulations! You've successfully implemented a robust authentication and authorization layer for your MCP server. By following these steps, you have:
- Defined clear roles and permissions.
- Created a centralized service for handling JWTs.
- Built a middleware to protect all incoming requests.
- Enforced granular permissions at the tool level.
Your MCP server is no longer an open door—it's a secure service. From here, you can expand on these concepts by adding more roles, more permissions, and even more complex business logic to your authorization system.
\ Star our GitHub repository to stay updated and receive notifications about future improvements.
You May Also Like

Gold Hits $3,700 as Sprott’s Wong Says Dollar’s Store-of-Value Crown May Slip

Italy becomes first EU country to pass comprehensive AI law
